Paul Gartside 18' Racing Gaff Cutter • Cabinversion designed by Dominik Gschwind

2013-01-05

Week 22 - Boatlaunch

Boatlaunch at the harbour of Lyme Regis UK
December 5th 2012


This is the last post in my diary which documents a wide range of the building process of my 18' gaff cutter Glóey. It was a great pleasure to write about this exciting project and I hope it was and will be an inspiration for anyone who wants to build a similar boat or who just loves wooden boats.
Great thanks to everyone who has supported me and in special to all people at the Boat Building Academy BBA in Lyme Regis who helped me becoming a passionate boatbuilder...


••• END •••

2013-01-04

Week 21/22 - Fittings / Rigging


All what is written about in this post happened the last 36 hours before the boatlaunch... it was just crazy!
Some of us and myself have been working day and night since a while with some very few hours of sleep each night. But the motivation to get Glóey finished for the launch on december 5th 2012 was unbreakable.


The fittings on a boat can have a similar effect like accessoires in the world of fashion. They add accents and set contrasts to the timber which ends in a joyfull unit for our sences.
Sorry, if I'm a little sentimental at that stage but while working those last hours on the boat I simply was too exhausted to realize it all...
Most of the fittings we used on Glóey are in bronze which is an excellent material combining very good properties of strength and corrosionresistance with optical beauty.
It was no question for me which material to use on the fittings... all material on Glóey is just of the best available quality and therefore it was a kind of logic to run that concept all the way to the end.
A cutterrig incoorporates a lot of robe and blocks. All robe is of braided type with a hemp color (Lyros Classic).
I used 12mm on the mainsheet, 10mm on all halyards and foresailsheets etc. and 8mm for the toppinglift and the topsailropes.
There are 6 ashdeckblocks (Davey) fixed on the masttabernacle and all the rest of the blocks are tufnolblocks (HYE). They are much cheaper but excellent quality and they look good on a wooden boat with creamy sails.
Beside that aspect they are also aging very well and only need minimal maintenance.
Quite a lot of fittings were necessary on the mast and spars. On the photo to the right you can see the cranseiron at the fore end of the bowsprit. It has 4 eyes and connects bobstay, bowspritshrouds, and traveller for the flying set jibsail.
Bobstay and bowspritshrouds as well as the 4 mast shrouds, the forestay and the running backstays are in 7x19 stainless steel wire (3/16").
All throughfastenings are either sealed with epoxy or at least bedded with butyl mastic  This is an important measure to avoid moisture getting in the timber.

On the photo you can see the chainplate for the portside bowspritshroud. The 316 stainless machinescrews are fastened through the beamshelf inside the hull to spread the load on the structure.


Other fittings which are not positioned over such a strong element are reinforced inside with a hardwoodpad (like turningblocks on the coachtop etc.).
Oh yes... I nearly forgot it... the flags :-)
They were under my workingbench for many weeks because I absolutely wanted to have a UK and a Swiss flag hoisted on launchday. A nice last work the evening before launchday.
The following picture gives a good overview on Glóey's deckplan with all those numerous fittings she needed. There is indeed also a pair of oarlocks because I wanted to be able to row out and in the harbour instead of having an outboardmotor which mostly takes a lot of the charme on a boat...


2013-01-03

Week 20/21 - Varnishing / Painting

Painting and Varnishing... this is more or less the end of all woodwork on the built of Glóey.
However another very exciting step leading to the final finish.
All starts with a general preparation of sanding through the different grits.
First we checked the hull and had quite some smallrepairs to do before beeing ready to paint. I talk about minor damages that occured during the buildingtime. The most of it could be filled with P38 a polyesterbased filler that goes off in minutes. Then the whole hullsurface above the waterline got cleaned and tacked off (getting all dust away with tackraggs). 
We masked the painting-perimeter with 3M's Blue Tape and then we were ready for the paint.
Because of the low temperatures in November we had to build a tent around the boat and heat the inside up with a small ventheater.
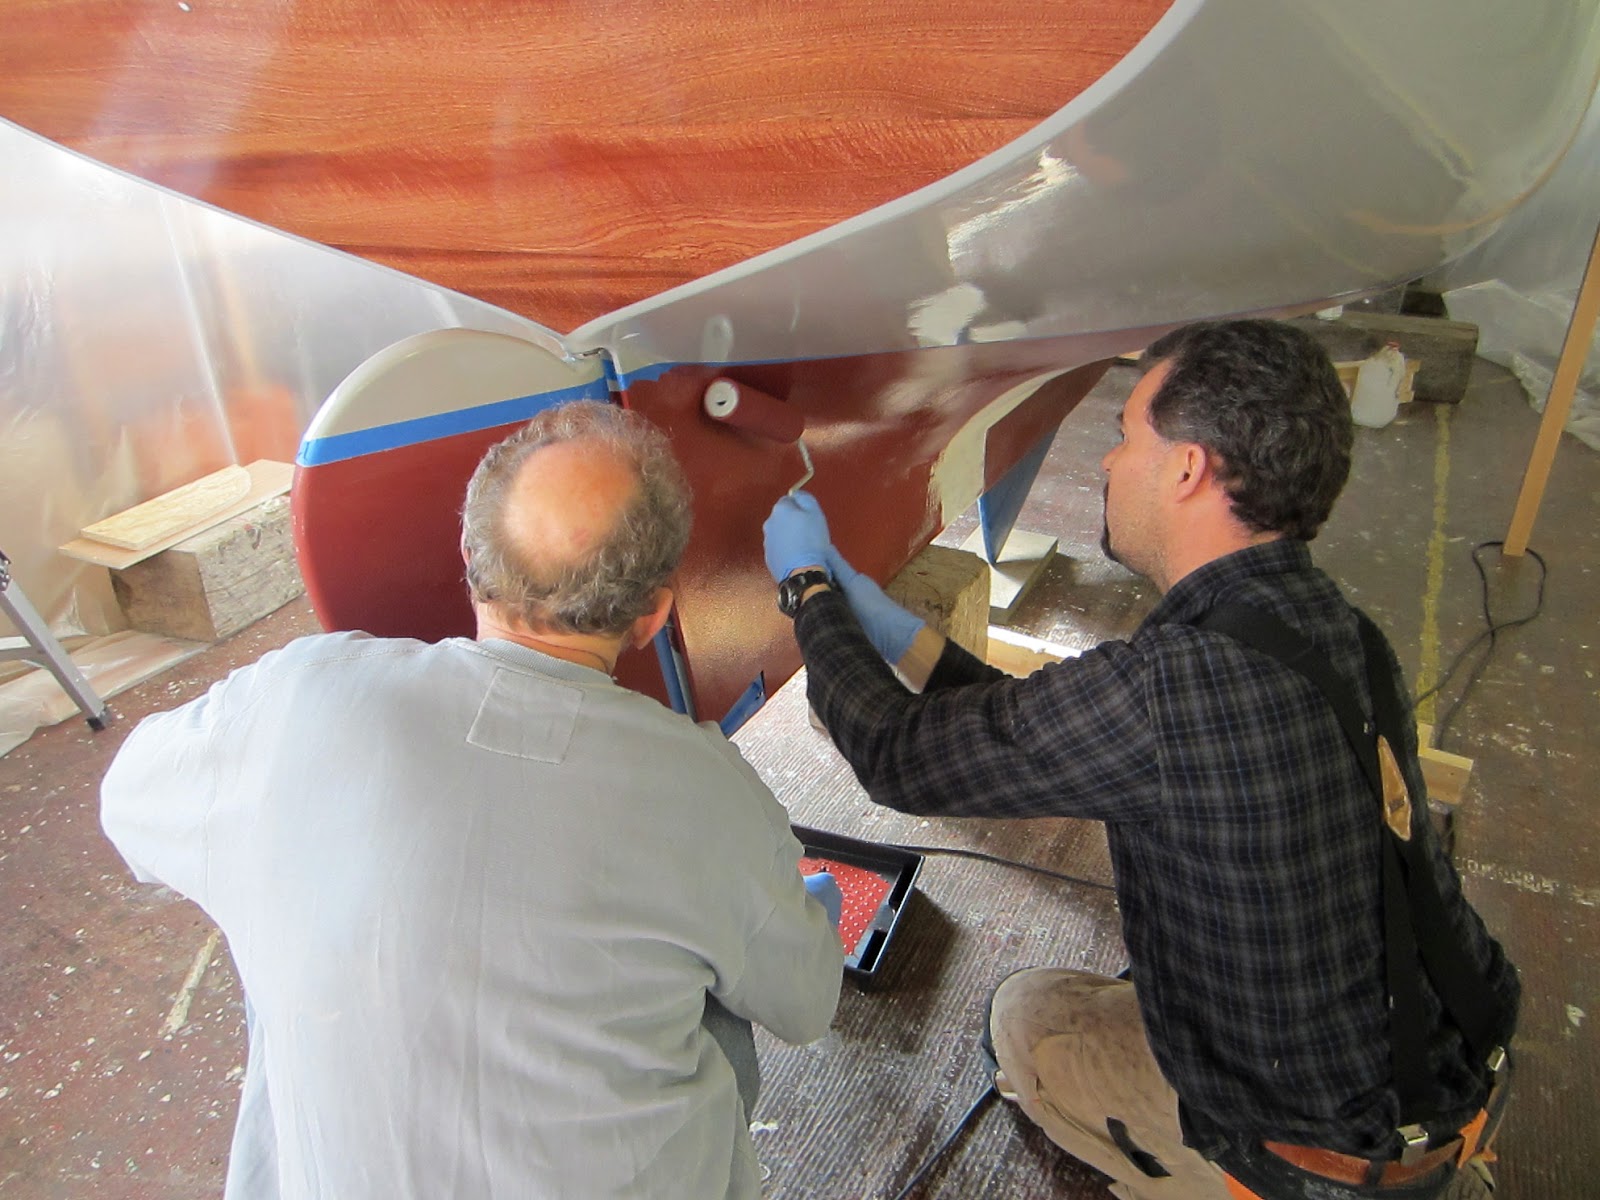
I've choosen a 2-pack paint in a light and very warm grey from EPIFANES... timeless and elegant with all the warm timber-nuances.


Many weeks before when we did build the cradle we decided to place it so that it supports the hull just below the waterline. This allowed now to first paint all the parts above the waterline.
When changing to prepare for the antifoul below the waterline we've built a jig through the openings of the portholes (see photo) which allowed to take the cradles away.


Ok, 2 coats of PU based 2-pack paint above the waterline (rolled and tacked-off) and 2 coats of EPIFANES Foulaway below (rolled only). We used West System's yellow special rollers which are expensive but work really well.
The parts where the keel was stepped on 2 wooden blocks was allready painted with antifoul while the boat was on the crane some days earlier!


Well, so far so good... time for the bright varnished parts.
The same deal here, all starts with a really substancial sanding beginning with 120 grit then 150, 180 and finally 240. The mainproblem is that when sanding with the rougher grits you can't use protecting gloves which results in very very very smooth hands :-) ... to be honest we just managed to finish sanding on that boat when the first fingers started getting bloody!
After a general clean with the vacuumer (equiped with a hairy hole) we cleaned the whole surface with white spirit and finally got all dustparticles away with tack-raggs. All bright varnishing was made with single-pack varnish starting with 4 coats of EPIFANES Rapid Clear which builds up a certain thickness without need for sanding inbetween. And after that 2 coats with traditional Clear Varnish from EPIFANES with a sanding with 400 grit paper inbetween (first 240 grit after Rapid Clear). It was as much as was possible in the resting time before the boat launch respecting the recommended overcoatingtimes etc.
The contrast between the fully sanded boat and the newly varnished one is enormous and every stroke with the brush is a pure joy when you can see the beautiful mahogany shining through...
Compare the two photos and you can imagine what i mean... there is something magic in varnishing :-)

However the whole process off painting and varnishing is a very interesting one and it brought Glóey much closer to her final look.
Some words to the coachtop: after sheating the top with canvas we coated it with Seatech (Hempel) a 2-pack epoxy primer. On top of that we applied the same 2-pack PU paint as on the hull.

Inside the benchboxes in the cockpit we also used Seatech and the aerea behind the benches is painted white.

2013-01-02

Week 20 - Ballastkeel / Slidinghatch

In my post of week 7/8 I allready described how we prepared the ballastkeel-plug for Irons Brothers to cast the leadkeel. And here you can see how both the leadkeel and the plug got delivered.
We were very happy with the result and they have drilled the holes for the bolts as shown on our drawing... excellent.
The first time since many weeks we lifted the boat out of it's exact level position in the cradle, placed her on 4 trolleys and moved it under the crane.
The leadkeel has a weigth of 498 kg and therefore health and savety played a big role when handling it.
For that reason we decided to build a drilljig for drilling the boltholes instead of dryfitting the real keel and drill through those holes.
That drilljig consisted of a sandwich of 3 sheets of plywood as visible on the photo to the right. And it both allowed to place the drill at the right position as well as in the right angle (6 of 9 bolts are in an angle!).
The drilljob with this jig let us achieve a very accurate result... all 9 holes came out at the planed position on the topside :-)
Now the next thrilling moment... will it fitt or not?
Yes it fitted excellently!
What a good feeling,... this was a bit of an unsure thing because of the fact that the plug had to be fashioned oversized to respect the shrinkage of about 0.5% when casting lead. With other words... we never had the chance to check the fitt of the plug before!
A cleansweep over the contactsurface and ready for the final fitt. I should mention that we've sealed all drilled holes with epoxy overnight!
We used 3M's Marine Adhesive Sealant 5200, a very sticky white material which we spread over the whole topside of the ballastkeel.
All 9 bolts are 3/8" in diameter and made from siliconbronze rod.
When tightening the nuts we had to work in intervalls with breaks of some hours inbetween to give the sealant time to spread and get the most of the airvoids out.
The photo to the left shows the dryfitt which made us really happy :-)
Some of the very last elements was the sliding-hatch on the coachtop. This was not the easiest part of the boat to be honest ...but i wanted to get it very well working as well as aestethicly nice too.

To reach that goal one of the most important things was that both rails on the coachroof got positioned very very accurate.
They both have a routed 4mm wide slot (see photo) in which the brassplatefitting will slide in the future.
When glueing the rails i aligned the slots to the exakt heigths at each end with the help of a selflevelling laser.
What a fantastic tool... it made accurate work so much easier!

The mentioned slidingslot was prepared with very fine sandpaper and masked when varnishing. The idea was to get the slot oiled and waxed in a second step... the oil as a lubricant and the wax to avoid drying out of the timber. And this way the slidingslot can easily be maintained later.

The hatchshell itself was made out of 2 sheets of marine plywood, cold molded over a former in the shape of the coachtop below.
An inner frame and an outher frame all in sapele mahogani made the whole slidinghatch very rigid and formstable. Thinking about the fact that the boom can touch the aft end of the hatch when lowering I made this part extrastrong and it also is a nice way to get a good grip with your hands when moving it.

I'm sorry for having no better photos of the finished hatch below.... they are a quite unsharp, but the boat is now covered until spring :-)
However, they give an idea of how the slidinghatch looks finished...


2012-12-29

Week 18/19 - Canvas / Rails / Benches

Sheating with canvas was one of my big wishes but I didn't want to use it on the maindeck. So the plan was to use it on the coachtop.
I found an excellent quality of canvas at John's Traditional Boat Supply 

http://www.tradboats.com

John was also very helpful with tipps about the correct use.

My idea was to use that traditional material with the possibilities and the high durability of modern epoxy.
And indeed the idea worked really well. We started with some samples to find out which would be the best way to apply it.
That canvas comes in a width of 2.74m which allows to lay quite big surfaces without any need for seams.

After cutting to size with an appropriate overlapp at the edges we first coated the whole coachtop with plain epoxy resin. Then we layed the canvasfabric relaxed over the whole surface and molded it from the centre to the sides just with our hands (with gloves for sure). It's really important to do this with 2 persons so that all molding can be done symmetrically.
The next workingstep is to add epoxy with a wide brush and stipple it on the canvas until all is fully wetted through. It finishes by using squegees and working again from the centre symmetrically to the sides.
The target is to achieve a topsurface showing a relatively rough fabricpattern which acts as an antislipsurface.
At the edges the fabric should be pulled and glued over the edge with coppertacks. The amount of overlapp depends on the later covering  rubrail, just make sure to cover all fabric and some mils more.
As visible on the photo all edges and roundings have to be treated with all necessary cuts and the canvas can be cut after getting green (time depends on the temperature).

Before finishing the boat for all painting and varnishing we had to fashion and fasten all rails and rubbers. The photo below shows the rubber along the coachtop, the quadrant covering the deck-coaming joint, the toerail and rubber along the sheer with holes for waterdrainage and fenderfastenings as well as the slotted rails for the slidinghatch on the top.


All these elements were fashioned from sapele mahogani, scarfed to extend the length were necessary and smoothly rounded.


The toerails needed beeing steambent some weeks before allready otherwise there would have been to much stress in the material with the risk for cracking. During the decklayingwork we had possibilities to fix temporary wooden blocks from the underdecktop into the beamshelf. This allowed to use the boats sheer as a former when steambending (see photo).

This works really well but two aspects are important to be considered. One is the fact that after clamping for about 24 hours when releasing the clamps there is quite a bit of springback in the material. This is no problem but the elements should then be stored somehow in the bend shape.
The other point is that there should be an appropriate time of drying to get the moisturecontent in the timber down to 12-15 percent before glueing with epoxy.
All fastenings are both glued with epoxy and screwed with siliconbronze screws. We used screwdiggers and grainplugcutters to get all mechanical fastenings covered with wood (see on photo).


And this is how the finish looked at the end.
I should name that the filigrane quadrant between the deck and the coamings is fastened with brass panelpins instead of screws... to get a more descreed detail. But the panelpins are punshed 1 mil in and the gap got filled with thickened epoxy with also added sapeledust to get a similar color.


Now some details about the benches in the cockpit. The basic construction consists of marine plywood combined with some hardwoodframing.
Connected to the cabin there is a benchbridge which can't be opened. It works as a extension of the insidespace! The aft bench towards the stern is a buoncytank with a watertight hatch (can be used to store fenders).
The sittingarea of the benches ends with a smoothly rounded hardwoodpiece which sticks up about 3/4" over the surface. Behind thisone there is a storagesurface for all kind of things which are in use when sailing (polsters, books, lifejackets etc.). We called them backbenches.
This is also the space where the two oars are stored but hanging on the deckunderside.
The two sidebenches are equiped with openable lids (benchboards hinched to the sapeleframe) with a waterdrainagechannel to keep water from the sea or rain outside. They are not fully watertight but will in case of an emergency also act as buoncy, at least for a limited time.
The benches are fashioned of prudently selected sapele mahogani boards. We will later see pictures of the final varnished look!


On this picture you can see the storagespace which is available round the whole cockpit. On those backbenches we used normal marine plywood which later will be painted white.
Considering the fact that Glóey is a little cruiser I designed the benchdepth extra generous.
The photo to the left gives an idea of the dimensions :-)